I had been wanting to make wooden shudder message centers for quite awhile, so we took off to our Habitat for Humanity Restore in search of some that would work for what I was wanting. Unfortunately, we didn't find what we were looking for that day but I did find something that SCREAMED "make ME into something".
Antique Cabinet Doors with handles and hardware!
I just HAD to have some since they were just .75 cents each. I'm all about making something new out of something old and spending very little money in the process.
When I bought them, I wasn't quite sure exactly what I wanted to do with them, but I knew I would come up with something. I just LOVED them and knew they had potential. On the way home from that shopping adventure, my husband said the lines made from the slats reminded him of a chalkboard. I immediately agreed and a quick stop at Hobby Lobby to pick up some chalkboard paint was all I needed since I had everything else at home.
Getting Started:
the door, rotary cutter & cutting mat, fabric, mod podge, white acrylic paint, black paint, chalkboard paint, paint brushes of different sizes, embellishment (I used ribbon, needle/thread, cover your own button kit), chalk markers (since I HATE traditional chalk), baby wipes for clean up, screwdriver, hot glue gun and sticks

Remove all hardware and hinges. Clean up the door as needed.
Paint the line indentions with white paint. I didn't worry about getting it on the main section since I was able to just wipe that off with a baby wipe before it dried. I'm all about cutting corners! Just make sure the white paint completely fills all of the crevices.
Using a foam brush, I painted the main area with the chalkboard paint, being careful to not touch the white lines.
I then painted the rest of the door with regular black acrylic paint. I mostly only worried about getting full coverage on the outside edges since most of the rest would be covered with fabric. You definitely want to make sure you paint wraps around the edges for a finished look when it is hanging or displayed. At this point, I also went back and touched up any places that needed some extra TLC. The chalkboard paint did take several layers.
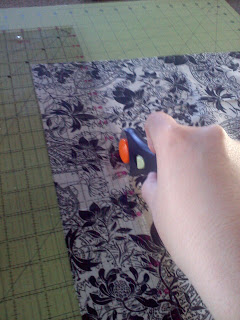
Using my rotary cutter and cutting mat, I cut the four needed fabric strips. You need to cut it VERY slightly smaller than the actual measurement for the mod podge to be applied. This is why I painted the remainder of the door with a matching color (which black worked great and was easy....another color would have made it more difficult around the chalkboard paint and I like EASY!).Brush mod podge over the cabinet, lay down the fabric, smooth it out, make sure it is straight and then coat the fabric with mod podge. Repeating for each side. I let my fabric over lap on the short sides and let the long sides cover them. I didn't worry about mitering corners or lining them up. It worked well just overlapping as long as I smoothed it out tightly and applied extra mod podge at the seams. I also did a bit more paint touch up while everything was drying.
Using a little elbow grease, I cleaned up the handle and then used mod podge to adhere a small fabric scrap around the handle. After all was dry, I used sharp scissors to poke a hole through the fabric to allow the screws to go back through and reattached the handle.
Though I liked the finished project as it was, I thought it would be neat to put an embellishment in the corner. I went through what I had, but didn't really see anything that was "right". I came up with making a flower from black satin ribbon by making loops and sewing them together. In the center, I covered a button with another fabric scrap. I used hot glue to attach it.
Finished! Added a piece of ribbon to the handle to hold a marker (otherwise I can NEVER find one when I need it!). I had originally planned to hang it on the wall, but instead used a decorative plate holder to display it. I wrote our word focus of the year"Courageous" and a message that is important to us in helping to work on that goal. "The only way we'll ever stand it on our KNEES WITH LIFTED HANDS."
Before and after! Can't wait to start the next one to give as a gift or maybe for my daughter's room or another area of the house.


No comments:
Post a Comment